Posts

Showing posts with the label goldsmith

Busy, Busy, Busy

Image
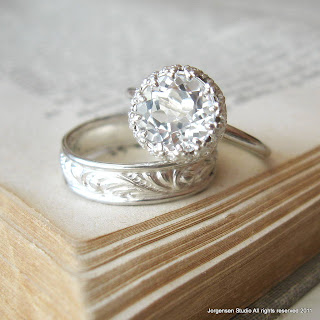
It has been awhile since I've posted, I am sorry. Life just takes over and my blog gets forgotten. I keep telling myself I need to get better at this, but like exercise its all too easy to procrastinate this task until tomorrow. I have been busy, June is a big month here. Two birthdays, a graduation, everyone home for the summer. Trips to state parks, garage sales, picnics and new jewelry to make for wedding season. I just thought I would post a few pictures of the new pieces, some have been posted to the Etsy shop, some not yet. This is the new big white topaz "Let them Eat Cake" ring & the new swirl wedding band, both in sterling silver bright finish. Listed Here The new white topaz three stone ring, bright finish, round faceted stones. Sterling silver patterned band. Listed Here I have had these beautiful heart shaped blue topaz stones forever, but they were just waiting for the right inspiration. A three stone ring with a center ...

Anniversary Band in Sterling and White Topaz

Image
The new anniversay band. I have been wanting to make this ring for such a long time. It took me awhile to figure out the engineering of it, but all that time scratching my head paid off, I think. I am so smitten with it & how it looks with the stacking rings. It has just been added to the Etsy shop : Here It is available right now in a limited number for 64.00 I am looking forward to making these with colored gems too! I want more.

Custom Flower Ring in Sterling Silver

Image
Its been crazy in my life lately. We have moved twice this summer. Packed, unpacked, oops new job, pack, drive cross country, unpack. Whew! We are finally getting settled in our new home though and all the children are back at their respective schools. I have been busy with custom orders so I thought I would give you a look. One is a totally new direction. A customer contacted me with a picture of an old Mexican Silver ring & wanted one made. Here is my new take on an old design: All the little marquise shapes were soldered together and hand shaped. All the little buds/stem pieces were made & then everything placed down on silver sheet. I imagine there were over 100 pieces of solder individually placed the first round of soldering. Then I pierced through the sheet and cut out shapes to give the piece a bit of lightness. It was then oxidized & polished back to show the pattern. I love the way it turned out. As with most of my custom work, I do test pieces first. I have a sma...

Custom Wedding Set

Image
I often receive requests for custom items. The most favorite of these requests is always engagement and wedding rings. It never stops being an incredible honor to make something so special and important in another person's life. The sentiment behind it is so wonderful and to have your work have that legacy is just humbling. Here are some pictures of a new wedding set for a soon to be wed couple.

Anatomy of a Tapered Bezel

Image
I use mostly bezel settings in my work. I make my rings so that the bezel is flush with the band and does not sit atop of it for a more integrated look. Having the bezel setting taper allows for a bigger stone to be set while still allowing the bands to sit closer together for stacking rings. Being mostly self taught, I looked to the google first to see if I could find a tutorial on how to make these types of bezels. There were none to be found. I did find a rather heavy bezel block that is used to make these tapered bezels and bought it, but alas, it did not come with instructions. After many failed attempts to make a cylinder turn into a cone, I figured I must be doing something horribly wrong. Wouldn't you know it, there was math involved, much to my dismay. I am going to show you the process I have come to for making this little tapered bezel step by step. Except for the math part ( you will need that to make your template), it is simple. I did come across this nifty cone ca...

The Anatomy of a Wedding Set

Image
Commissions are fun to do. Stressful, but fun. The sweetest girl named Jill asked me to custom make her & her beloved a wedding set similar to one of the designs in my shop. I was so honored to be chosen to make something so special, I thought I would share the process...... First I had to build the stock for the bands in flat pieces. Getting the pieces of stock to cooperate and lie flat is tricky sometimes but that is where a good rawhide mallet comes into play. This picture shows the two pieces made for the rings. The one on the left is after the silver has been picked & the one on the right is before pickle, just after soldering with all the flux still on the silver. It looks bad at first but as you can see the pickle cleans it up nicely. Then the next step is to cut the new stock to length & shape around the mandrel to make rings. The ends have to be filed & fitted several times to make sure they fit just right so the solder join is strong. A rawhide mallet works be...